The WordPress blogging platform does support installing and updating your plugins using SSH/SFTP! So, why is it that it doesn’t show up as an option when updating your plugins?
Well, as it turns out, your PHP installation must be configured to support SSH before this option will show up in your WordPress dashboard. In this article I’ll explain how to set this up using
just a few simple commands or
a plugin.
Option 1: Install libssh2 and use the built-in WordPress SSH/SFTP Support
The upside of following this guide instead of installing
the plugin is you’ll be installing libssh2, which means you’re enabling SSH/SFTP support across all PHP applications. You’re also be enabling and using the built-in WordPress support for SSH/SFTP, which is updated and supported with each new release. I personally followed this method, so I can also confirm that it works first-hand. The downside to this guide, of course, is that it takes a bit longer.
Step 1: See if it’s enabled already
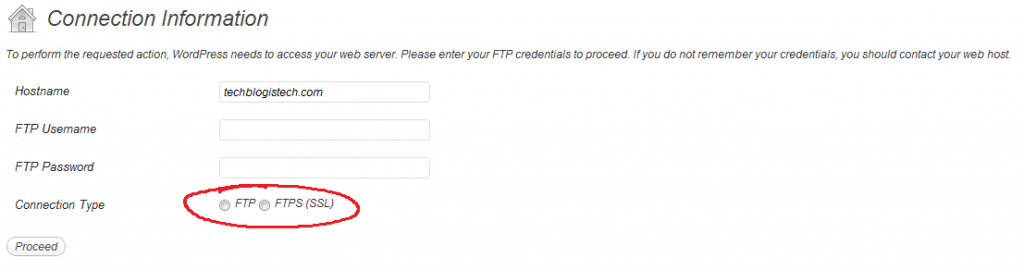
Chances are SSH/SFTP is not enabled already, but it doesn’t hurt to check. If SSH is not enabled, your WordPress connection info page should look like this when you go to install updates:
Notice the distinct lack of an SSH/SFTP option. If this is what your page looks like, continue with the instructions below!
Step 2: Install all the development tools you’ll need
We’ll be installing the PHP package for
libssh2, which will be compiled from source; this requires some development tools. Run these commands to install the tools you need:
$ sudo yum groupinstall "Development Tools"
$ sudo yum install kernel-devel kernel-headers
Step 3: Install libssh2
You’ll need libssh2 and some php development tools, so make sure those are installed by running the following command:
$ sudo yum install php-devel php-pear libssh2 libssh2-devel
Step 4: Use PECL to install SSH2 for PHP
PECL is the PHP Extension Community Library and we can use it to install SSH for PHP, like so:
$ sudo pecl install -f ssh2
After running this command, you’ll notice that it stops at a line and waits for input from you. It will look like this:
..
........done: 22,740 bytes
5 source files, building
running: phpize
Configuring for:
PHP Api Version:         20041225
Zend Module Api No:      20060613
Zend Extension Api No:   220060519
libssh2 prefix? [autodetect] :
There’s no need to enter a specific prefix; just press the [enter] key to move forward and it will autodetect the prefix.
Step 5: Configure PHP to load the SSH2 extension
Now that the SSH2 extension has been installed, you just have to tell PHP to load it. Configure PHP to load the extension by running the following commands:
$ sudo touch /etc/php.d/ssh2.ini
$ echo 'extension=ssh2.so' | sudo tee -a /etc/php.d/ssh2.ini
Step 6: Restart Apache
You’re almost done! Just restart the web server to have your changes take effect:
$ sudo /etc/init.d/httpd restart
Step 7: Verify the extension is loaded
Finally, check to see if the extension has been loaded by running php -m to see the installed PHP modules:
$ php -m | grep ssh2
ssh2
If you don’t see the ssh2 output from the above command, then something went wrong! Try following the steps again carefully to see what you might have missed.
Finish Line
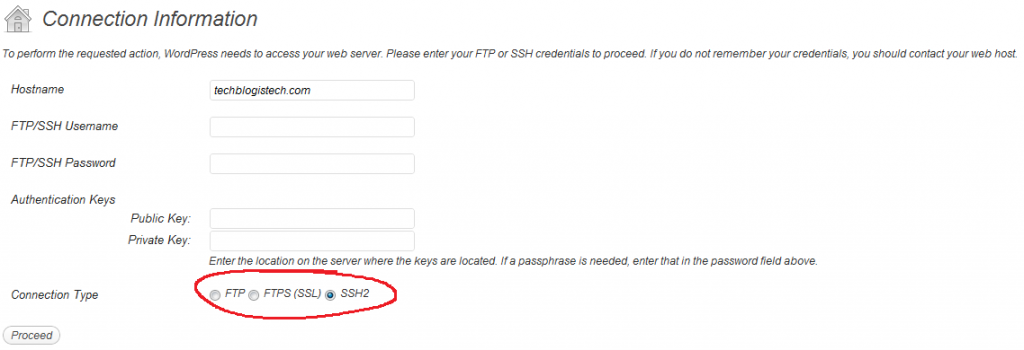
You’re all done! You can now use SFTP to install and update plugins in WordPress. If you did everything correctly, your WordPress connection info page should now look like this:
* Thanks to
Jacob for the original
guide to installing libssh2 for PHP under CentOS.